How to check a starter: detailed instructions. How to check a starter: several methods for testing equipment Checking a starter VAZ 2107 from a battery
A lot has been said about the role of the starter in the car, so there is no need to repeat the common truths. He is a starter, as they say, and in "Africa" a starter, from which the engine begins to work. If it does not work, then there are two options: either try to start the car "from the pusher", or look for the reason why the starter does not want to work.
Today we'll talk about how to check the VAZ 2109 starter at home.
The simplest way to test the starter motor is to short circuit. To check if the starter works, short-circuit with something metallic (a screwdriver or a key) the two large terminals located on the starter. On the working starter, after the terminals are closed, sparking will be noticeable, if there are sparks, and the starter does not work, then do the following:
- The first thing that comes to mind with these symptoms is oxidation of the battery terminals (battery), make sure that they are in good condition, if not, clean them with a knife, or a screwdriver, or sandpaper.
- Replace the starter relay, often the problem lies in it.
- Use a tester to ring the wire that comes from the starter relay, it is often not visible at all, since the terminal of this wire is located at the bottom of the starter.
If the starter turns when the terminals are closed, but very weakly, then there are several assumptions:
- It may be a weak battery, if so -. After charging for half an hour, try starting the engine again.
- Another way to check the starter is to check the contact in the starter power circuit. Check the integrity of the wires going to the starter.
If characteristic clicks are heard when turning the ignition key, this may mean the following:
- Again, it might be discharged.
- Poor contact of the wires that go to the starter. Check all connections, if necessary tighten the connection nuts and tighten the loose contacts.
- If none of the above helped, the retractor relay is most likely out of order.
Among other things, it cannot be ruled out that it can also be the reason that the motor does not start.
To eliminate this possibility, clean the contacts leading to the lock. Disconnect one at a time so you don't mix anything up.
As a rule, these methods are quite enough to check the VAZ 2109 starter and understand what the problem is. If all your tests did not give any results, contact a specialist or have it done.
Now you know how to check the VAZ 2109 starter yourself, thanks for your attention. You may need to repair the starter, how to do it is written.
We recommend a video on how to check a VAZ 2109 starter and make repairs
& nbsp
Starter failure is a common vehicle malfunction. Their repair, as a rule, is carried out by specialized service stations. Before you evacuate the car for repair or replacement of the starter, you should be 100% sure that this particular unit is faulty.
It is also advisable to diagnose which of the starter elements is faulty in order to make a decision on repair or replacement of the unit, estimate the approximate cost of work, the possibility of self-elimination of the malfunction.
Scheme and principle of operation
The starter motor is one of the most conservative parts of a car. For the first time such an electrical device was tested by Charles Kuttering in 1912, that is, more than a hundred years ago. At first, it also served as a generator.
But in the form in which the starter is used to start modern cars with engines internal combustion, he owes to the American inventor and car manufacturer Vincent Hugo Bendix, who immortalized his name in one of the main parts of the launch device.
A typical functional diagram of a starter is shown in the figure:
The principle of operation of the starter is practically the same for all car models with internal combustion engines. When the ignition switch is turned on to the "Start" position, the starting current is supplied to the pull-in winding.
It, in turn, drives the traction relay armature and the contact spring rod. The traction relay acts on a lever, commonly referred to as a fork, which pushes the freewheel with gear (bendix) into engagement with the flywheel. At the same time, the contact plate closes the nickels, through which the voltage is applied to start the starter motor.
The typical functional diagram of the starter is so well thought out and tested that the difference in the models of starting devices lies only in design features and the materials from which the units are made.
However, starters have their vulnerabilities:
- retractor relay;
- electric motor brushes;
- nickels;
- fork;
- freewheel clutch;
- gear;
- anchor collector;
- armature bushings;
- damper spring.
Actually, almost every node of this device during operation can become unusable. This is primarily due to the fact that when starting, especially in the cold season, the starter gives off a lot of power, experiences extreme loads, and huge currents flow through it.
It is important, if the starter fails to work, to diagnose it and determine which of its nodes is faulty. None of the modern computer diagnostic devices can do this. You should be guided by experience and your own knowledge.
The main symptoms of a starter malfunction
Failure rarely occurs instantly. Very often, faults, especially of the mechanical components of the car, are indicated by extraneous abnormal sounds, untimely operation, and an extraneous smell. Let's consider the most common cases.
Drives the motor into rotation intermittently
Although the starter motor always rotates. During the start skip, a metal crackling and grinding is heard.
Possible malfunctions: fork wear, damper spring failure, gear wear... Further diagnostics and determination of the exact cause of the malfunction is possible only after removing the starter.

Continuously rotates at start, but does not rotate the engine
At the same time, no extraneous noise is heard.
Most likely, the plug is out of order... Removal of the starter and replacement of the fork is required. The plug itself is inexpensive (about 1000 rubles), you can replace it yourself.

Starts the engine, but a metallic buzz is heard when the engine is running
Stop the engine immediately. The probable causes of the malfunction are - sticking of the solenoid relay, jamming of the fork or gear... Further determination of the cause of the malfunction requires the removal of the starter.

Periodically, the engine may be triggered and start, or it may be inoperative
In this case, do not hit hard with a hammer or other metal object on the back of the starter housing. If the engine starts to start, the starter requires replacement of brushes due to their great wear and tear.
The starter solenoid relay clicks, but the starter does not turn
The most likely reason is insufficient battery power... The voltage at the battery terminals is enough for the solenoid relay to operate, but the contact plate does not close the nickle, the voltage is not supplied to the starter motor.
If the battery voltage is normal, it is possible burning dimes or lack of tension on the power wire.
Video - when the starter retractor relay clicks, but the starter itself does not turn:
In many vehicles, a powerful 800 ampere fuse is included in the power positive circuit. It is necessary to check its serviceability, as well as the presence of +12 Volts on the thick wire at the time of start.
This situation also occurs when the battery capacity is lost.
The starter motor turns slowly, although the battery is fully charged
Maybe, bushings are worn out, there is dirt in the interior starter motor.

The smell of electric burning during the start
As a rule, this indicates burning of the winding of the retractor relay, less often - the armature winding... This may be accompanied by heating of the wires going to the starter.
The solenoid relay does not work, the starter does not rotate
The most common reason is malfunction of the electrical circuit of the car... In this case, it is necessary to start by checking the health of the car's electrical wiring, the correct functioning of the engine control unit and other electrical components of the car.
The sequence of monitoring the performance of the starter
If, when turning the ignition key to the "Start" position, the starter does not show any signs of life, you must perform the following sequence of actions:
1. Measure the voltage at the battery terminals with a multimeter. There must be at least 12 volts to start the engine. If less, charge the battery.
2. Next, you need to measure the quality of the tire "ground" of the car. It is necessary to check the contacts of the bus "minus battery" - the body of the car and "minus the battery" - the body of the engine, in fact, the starter. It is better to do this by turning on the ignition and measuring the voltages between the negative of the battery, the metal elements of the engine body and the cleaned elements of the engine body. Voltages must be strictly 0.0 Volts. If more, the contacts of the connections may be broken.
3. Better before proceeding. In many vehicles, an immobilizer can block the start of the engine, possibly a key binding is required. Malfunction of nodes automatic box gearshift can also enter a prohibition mode on auto start.
4. For further diagnostics of the starter, an electrical diagram of the car and a diagram of the location of the relays and fuses are required. The vehicle starting system can be organized in one of two ways. In cars of earlier years of production, the voltage to the starter solenoid relay was supplied directly from the contact group of the ignition switch. A failure of the contact group leads to a lack of voltage supplied to the solenoid relay. In this case, it is necessary to check the presence of contacts according to the ignition lock connection diagram. V modern cars the starter relay is used to control the operation of the starter, usually installed in the relay and fuse box in the engine compartment. It is necessary to check the serviceability of the relay, the presence of +12 Volts on its input contact. You can forcibly turn on the starter by closing the relay contacts.
In this case, be sure to translate mechanical box gears to neutral (!).
5. Next, go directly to work with the starter. It is usually located in the area of the flywheel. A more convenient location is between the engine and the radiator of the cooling system. In this case, access to it is simplified. Worse if the starter is located behind the engine under the exhaust manifold. In any case, it is necessary to trace the path of the wires coming from the starter. Two conductors depart from it: one thick (cross-section at least 25 sq. Mm) for starting the electric motor and a thin one for controlling the retractor relay.
6. First of all, it is necessary to strip a thin conductor in a convenient place, connect a wire with a cross section of at least 2 sq. Mm to it. and insulate the junction. Then place the transmission in neutral. Then connect the connected conductor to the positive terminal. If this does not follow any action on the part of the starter, the following options are possible:
- fault in the winding of the retractor relay (open circuit);
- wear of the starter motor brushes;
- breakage of the collector lamellas;
- breakage of the armature winding;
- lack of contact on the connector of a thin wire (often occurs when a thin conductor comes into the connector "for a chip", sometimes it is enough just to move it);
- lack of grounding on the car engine body (for greater confidence, you can connect the engine body with a negative battery with a powerful wire).
7. If the retractor relay has worked reliably, but the starter motor does not rotate, check for the presence of + 12 Volts at the output of the thick conductor. It usually has a nut connection, sometimes the contacts burn and char. In this case, the contact areas should be removed and cleaned. You should also check the connection of the thick wire in the area of the positive terminal of the battery.
8.Using a multimeter, you can check the resistance of the solenoid relay winding (between the connected conductor and the motor housing, it should be between 3 and 20 ohms for different types starters).
9. In the case when the previous actions did not lead to a positive result, it is necessary to start diagnosing the malfunction on the starter removed from the car.
Video - how to close the starter on a straight line if it does not turn:
Dismantling the starter and troubleshooting
Dismantle the starter in the following sequence:
- Disconnect the negative plug of the storage battery. Before disconnecting the battery, it is necessary to check that the ignition is turned off. In some cars, if you disconnect the battery while the ignition is on, the immobilizer may "untie", this is a serious problem.
- Disconnect the positive battery terminal. Disconnect the thick and thin wire from the battery terminals.
- Unscrew the battery mounting bolts (usually there are three of them). In some vehicles, it is necessary to remove some components in the engine compartment before this. It is better to use the vehicle repair manual to determine the sequence for dismantling. In many vehicles, the starter is removed from the bottom side.
After removing the starter, you can check its performance separately from the car. To do this, connect the negative terminal to the starter housing with a conductor with a cross section of at least 6 sq. Mm, the positive terminal with a bolt on the retractor relay closer to the starter motor housing. The engine must be running.
The lack of rotation of the electric motor is a sign of wear on the brushes or a malfunction of the collector.
Breakage of the armature windings is a very rare malfunction. The collector is repaired by replacing it. This operation is expensive, it may be cheaper to buy a serviceable used starter.
Next, check the operability of the solenoid relay, dimes and plugs. To do this, switch the positive thick wire to the terminal of the retractor bolt remote from the motor housing. Connect the conductor to the control terminal of the retractor relay, connect it to the positive terminal of the battery.
There should be a confident actuation (click) of the solenoid relay. The fork must drive the bendix (clutch with gear) until it stops. The starter motor must rotate stably.
It is advisable to turn the starter on and off several times, while making sure that the bendix moves to its full length and without jamming.
If the starter fork sometimes sticks, it must be replaced.
Next, you should check the runout of the motor shaft when the conductors are disconnected. To do this, you need to move the motor shaft in the transverse direction. Even small gaps in the hub-shaft area can lead to shaft displacement and mechanical contact of the armature with the stator.
The electric motor will spin more slowly, decelerate, and eventually overheat. In the process of carrying out routine maintenance of the starter, the bushings must be replaced.
To control the wear of the brushes, in most cases it is necessary complete disassembly starter. For many models, this is not difficult. From the back side of the starter, the armature limit ring is removed, then the through bolts of the starter are unscrewed, and it is disassembled.
There are screws on the front for removing the plug cover and the solenoid relay. As a rule, the starter brushes are made in a separate unit and change at the same time.
It is somewhat difficult to place the collector in the area of the brushes. You can artificially drown the brushes with a thin thread, then insert the anchor and remove the threads.
On the disassembled starter, it is easy to check the wear of the plug, the bendix, the operability of the solenoid relay winding. If there is visible wear on the collector, it is bored out during routine repairs.

After carrying out the repair work, the starter is assembled, controlling the centering of the rotating parts, then the operability is checked without installing it on the engine.
After that, the installation is carried out on the engine, the conductors are connected, and then the battery is connected.
Usually, after carrying out a set of maintenance work on the starter in full (replacing brushes, boring the starter, replacing bushings, forks, bendix if necessary, cleaning the inner surfaces), the starter will work properly for three to four years.
In order for the starter to last longer, the following rules should be followed:
- do not start the engine continuously for more than 15 seconds;
- in case of periodic failures in starting the starter or abnormal noises, you should immediately understand the causes of the malfunction and eliminate it;
How to quickly get rid of scratches on the car body
What does the installation of autobuffers give?
Mirror DVR Car DVRs Mirror
- Turning the key in the ignition switch turns on the ignition circuits. Further turn of the key to the “start” position supplies power to the relay coil 5. Power is supplied through a special switching relay.
- The emerging electromagnetic field shifts the armature of the retractor relay 7. The armature is connected through the lever 4 with the overrunning clutch 3, which moves along the starter shaft 2 along the guide slots.
- At a certain moment, the clutch gear is introduced into engagement with the ring gear mounted on the flywheel 12. At the same time, the contact plate 7 located on the movable armature of the relay closes the circuit through the contacts 8.
- Turns on the power supply to the windings of the electric motor 9. 10 through the gears scrolls with a frequency of up to 100 rpm the crankshaft 11 of the motor and starts it.
- After the engine starts and starts picking up speed, the gears are automatically disconnected. The decoupling takes place by means of a freewheel clutch.
- The key is released to the ignition on position. The vehicle is ready to start driving.
 Starter visualization
 A number of cars are equipped with various types of starter blockers. Manual transmission vehicles may require the clutch pedal to be depressed to prevent the engine from starting in gear. Automatic transmission allows starting when the selector is in the neutral or park position.
The car starter is designed for short-term operation, prolonged use of the device leads to overheating and failure.
A detailed visual explanation of the principles of the starter operation is demonstrated in the video tutorial shot for the author's channel by Mikhail Nesterov.
How to remove the starter from the car?
The starter motor is located on the side of the engine closer to the clutch housing. The complexity of removing the starter depends on the density of the layout of the engine compartment. On some types of vehicles, dismantling takes up to 3-4 hours.
Brief sequence of steps:
- Position the vehicle above the inspection pit to provide access to the lower anchorage points.
- Disconnect the battery terminal.
- Remove the steel or plastic sheet for the engine and transmission crankcase.
- Sometimes it may be necessary to dismantle the heat shield that protects the engine components from heating by the heat of the exhaust system.
- Remove the lower starter bolt or nut.
- To access the upper bolt, it may be necessary to remove the battery from the platform, engine air ducts, or dismantle the brackets for the cooling system pipes.
- Disconnect the wires from the starter, the terminals of which are screwed to the top of the electric motor. These points can be accessed from the top or bottom of the vehicle.
- Remove the upper bolt or nut.
- Pull starter motor carefully out of seat. Removing the assembly on multi-cylinder V-shaped engines may require dismantling the wheels, protective locker, exhaust manifold elements and the power unit support.
- Lift the machine upwards out of the engine compartment.
Each car has design features that affect the complexity of removing the starter. It is recommended to carry out the dismantling in a car service with experience and the required tools.
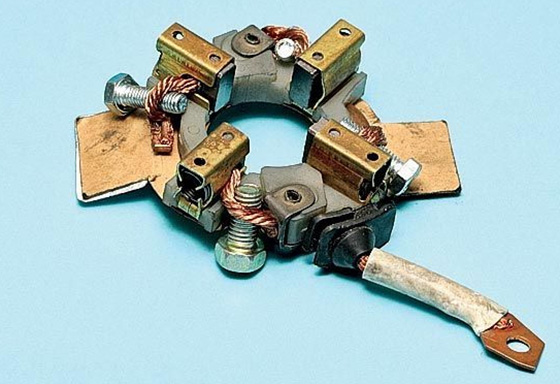
Below are photographs of Almera's dismantling and disassembly.
Removing the reinforcement bracket Removing the bolts General form removed starter Cover bolts Disassembled unit, arrows indicate stator and rotor Rotor with brush unit Planetary gearbox Removing the bendix from the shaft Gearbox lubrication before assembly The repaired unit is ready for installation
The main symptoms of a starter malfunction
Symptoms that indicate a problem with the starter motor:
- the crankshaft does not start to rotate, despite the operation of the starter;
- difficult rotation of the starter armature, accompanied by extraneous noise;
- Slow cranking of the shaft with a normal sound, not enough to start the engine;
- by turning the key in the ignition lock;
- the starter drive gear does not disengage with the flywheel after starting the engine;
- the power of the electric motor on a warmed-up power unit decreases;
- characteristic burning smell that occurs when the starter is running.
If such signs appear, it is advisable to diagnose and repair the starter. Long-term operation of a faulty unit will lead to complete failure.
The sequence of monitoring the performance of the starter
Procedure for checking the starter:
- Before starting to check the performance of the starter and starting circuits, it is necessary to check the battery charge and, if necessary, bring it to normal. Make sure the terminals are securely installed and free from corrosion and oxidation.
- Check the quality of the connection of the earth wires with the body and the starter. This requires a measurement of the voltage value between the negative terminal and the body or car engine. The test device should show zero.
- On vehicles equipped electronic systems control, it is necessary to carry out computer diagnostics, which will show the existing errors. Deciphering the error codes allows you to find out the causes of the malfunction.
- Check the serviceability of the switching relay or the serviceability of the circuits responsible for turning on the solenoid relay. To check, you will need an electrical diagram of the car indicating the connection points of the nodes.
- Check starter and solenoid relay on engine.
- If malfunctions are found, the starter is removed for repair and a more thorough check.
Checking the starter removed from the car for operability
If problems arise with the operation of the starter, it is required to check the components to determine the cause of the breakdown. The starter test can be done at home using a multi-function tester or test lamp.
Checks include:
- visual inspection and cleaning of parts;
- checking the operation of the retractor relay;
- measurement of resistance between the armature winding and the body;
- checking the resistance between the lamellae of the armature collector and the core;
- control of resistance between the housing and the stator windings;
- additional checks of starter parts.
The starter motor removed from the car is cleaned of dirt with a soft hair brush and then wiped off with a rag. Disassembly is carried out at a locksmith's workbench. The dismantled parts are washed and dried. To clean the windings, use a rag soaked in gasoline and blow with air. The rest of the parts can be washed in an alkaline bath or with kerosene. Then they begin to check and troubleshoot the nodes.
Solenoid relay diagnostics
Relay failure symptoms are:
- When the key in the ignition switch is turned to the “start” position, clicks are heard, indicating the operation of the relay. But the starter does not turn on at the same time, the brightness of the pilot lamps and external light signaling does not change.
- In a similar situation, a voltage drop is observed - the lamps dim.
- After starting the engine, the starter armature continues to rotate at increased speeds.
The reasons for the failure of the relay are:
- burning of contacts, due to which the supply of current decreases or stops;
- jamming of the relay armature;
- closing of the relay coil;
- destruction or subsidence of the return spring;
- damage to the case.
The relay is tested in the following steps:
- Clean contact surfaces from dirt and oxides.
- Connect the relay directly to the battery using the clip-on wires.
- Apply a negative signal to the starter housing. The click sound indicates the serviceability of the relay, if no sound is given, then the relay is faulty.
Rotor winding faults
The most common problems with the starter rotor (armature):
- punching the winding onto the shaft and then onto the starter housing and the car;
- poor contact at the points of connection of the winding with the collector due to the destruction of the soldered connection;
- closure of winding turns;
- ingress of metal shavings and brush particles between the collector lamellas;
- burnout of one or more lamellas.
To check the armature, the method of applying voltage to the starter bypassing the relay is used. If the shaft does not rotate, then disassembly of the starter and a detailed check of the condition of the armature is required.
De-anchor check methods:
- Winding breakdown is measured with a multimeter. It is possible to check the condition of the armature using a 220 V pilot lamp. The device is connected to the household network, one terminal is connected to the core, and the second is connected in turn to the collector lamellas.
- Damage to the solder joints is detected by visual inspection of the part.
- Manifold wear can also be detected visually. The depth of the grooves between the collector lamellas must be at least 0.5 mm.
- Turn-to-turn closures can only be determined in a specialized service equipped with a control device.
Stator faults
Stator problems include:
- turn-to-turn closure;
- breakdown to the case;
- breakage of the winding.
Testing with a multimeter is used to detect damage. The turn-to-turn short circuit is diagnosed only with special equipment.
Faulty brushes and bushings
The brush assembly may have malfunctions:
- wear, as a result of which the brushes do not fit tightly to the collector;
- jamming in the guides.
The brush assembly test consists of measuring the resistance value between the base plate and the brush holder. A healthy knot has a resistance tending to infinity. If this condition is not met, then there is a short circuit of the brush assembly. The removed brush assembly must be carefully inspected for cracks and chips on the graphite elements of the brushes. It is recommended to check the residual height of the parts; if the value is low, the unit needs to be replaced.
The starter rotor shaft is supported by copper or copper-graphite bushings, which are subject to natural wear. When a gap appears, the rotor is skewed, which leads to difficult rotation and uneven wear of the brushes. The operation of an electric motor with damaged bushings leads to damage to the windings or interturn faults.
Bendix and overrunning clutch malfunctions
After dismantling the assembly from the starter shaft, a visual check of the condition of the gear teeth should be carried out. Deep nicks, chipping and wear of tooth surfaces are unacceptable. The coupling must be free of corrosion.
Checking the functionality of the device:
- Wrap the bendix gear in a dense material (cardboard or cloth).
- Clamp the part by the gear with pliers or a vise.
- Try to turn the clutch ring (located behind the gear) by hand. The design of a serviceable clutch allows the ring to rotate easily in one direction. If the turn occurs with jamming or tightness, and it also turns out to rotate the ring in the opposite direction, then the bendix is faulty.
Refers to the number of non-separable and irreparable units. If damaged, it is replaced with a new part.
Other breakdowns of the launch system
Other starter failures include:
- damage to electrical wiring;
- mechanical damage to casings, covers and fittings;
- deformation or breakage of the plug;
- wear on the gear teeth or guide grooves on the shaft.
How to check the operation of the starter without removing it from the car?
The performance of a number of starter assemblies can be checked on the vehicle. For this, a tester or a test lamp is used. Inspection must be carried out in a safe manner, as there is a risk of injury.
How can you check the starter retractor relay?
Testing of the relay operation is carried out according to the following scheme:
- Check the relay harness for an open.
- Turn the key in the ignition and try to turn on the starter. If there is no characteristic click, then the relay is faulty.
- If there is a click, but the starter does not start, then it is necessary to check the condition of the contact pads. To do this, the signal wire from the lock is disconnected from the relay. Then connect the terminal of the battery and the starter with a suitable metal rod (for example, a screwdriver), applying current past the relay. If the starter armature rotates, then repair or replacement of the relay is definitely required.
Checking the starter armature
Checking the operability of the armature is carried out by applying voltage directly to the starter, bypassing the relay. The connection is made with thick copper wires to the battery terminals. If the starter armature rotates, then the unit is considered to be in good condition. Otherwise, dismantling of the device, its disassembly and full diagnostics are required.
Diagnostics of the brush, winding and starter bendix
Testing of the brush assembly is carried out by connecting with a lamp designed for an operating voltage of 12 V. One terminal of the lamp is connected to the brush holder, and the second is closed to the body. The working of the brush is indicated by the inclusion of the lamp. Otherwise, removal and disassembly of the starter is required.
The simplest way to test the condition of the winding is to connect a 220 V household lamp with a power of 75-100 W. The lamp is connected in series between the winding and the outer casing. One wire is fixed on the starter body, and the second is connected to the output wires of the windings. If the spiral of the lamp starts to glow, then this indicates a breakdown. It is possible to check the status with a multimeter operating in ohmmeter mode. When connected to a working winding, the resistance value should be within 10 kOhm.
To check the bendix, the method of short-term engaging of the starter in gear and the working brake is applied. The starter starts for a very short period of time - less than 1 second. If the car jerks, the unit is OK. If slipping begins, accompanied by the sound of a rotating anchor, then the starter must be removed and the bendix replaced.
How to check if the starter is taking current?
The term "starter takes current" means a voltage drop when trying to start, but rotation crankshaft occurs at a low speed. To check, you need to connect a voltmeter to the positive terminal of the battery and the car body. If there is a voltage drop of 10 V or less when trying to start, then this indicates a problem with the starter or wiring. It is considered normal to reduce the voltage to 11.5-12.0 V.
The starter is one of the most important elements and components of automotive electrical equipment. If it fails, then not all car owners know how to determine the malfunction of the starter and fix it.
Like any other unit of a car, it is common for a starter to break down at one time or another. In order to avoid extreme consequences and all sorts of complications, it is necessary to learn how to identify problems. We will learn how to determine the breakdown of a starter.
Determination of malfunction by ear
ATTENTION! Found a completely simple way to reduce fuel consumption! Don't believe me? An auto mechanic with 15 years of experience also did not believe until he tried it. And now he saves 35,000 rubles a year on gasoline!
Experienced drivers are used to listening to the car. And this is very good, because an unwanted breakdown of any part can be noticed at the beginning, by identifying the signs by ear. A timely stopped process will not lead to irreparable consequences, but will make it possible to repair the part.
Here are the main characteristic sounds, listening to which, you can determine the malfunction of the starter:
- Sticking sound produced when the ignition is turned on. In this case, the engine may not start at all or the engine will start with great difficulty. A problem of this kind indicates several points: a discharged battery, poor fixation of the battery terminals, broken wiring and internal malfunctions of the starter together with the traction relay;
- The sound of a machine spinning heavily. This is the noise of the starter armature, under the condition of normal operation of the traction motor. As a rule, the reasons for this situation are: wear of the armature bushings, oxidation of contacts, discharge of the battery, etc .;
- Slip sound from broken clutch rings;
- Rough movement or sticking sound. As a rule, this is due to a seized starter armature;
- Another noise associated with starter disconnection. As soon as the engine starts, the drive or traction lever sticks. If this type of problem occurs, you must immediately turn off the ignition by disconnecting the wire connecting the device directly to the relay.

In addition, starter malfunctions can be judged by various unusual noises, which give reason to think about replacing bearings, weakening any mechanisms or breaking.
Determining a fault using a tester
The starter motor does not rotate the flywheel or does it slowly. Obviously, the torsional force must be sufficient to start the internal combustion engine. If this does not happen, it is recommended to start checking the circuit.
The essence of the ideal chain operation boils down to the following:
- All contacts, including the "ground", must be fixed securely and tightly;
- The battery must be well charged;
- The wire from the traction must be intact and have good contact;
- All contacts of the ignition switch must function properly;
- The cable from the battery to the starter must not be damaged and loosely fixed.
Thus, it is worth paying attention to the problems listed above if the "starter-engine" connection is faulty.

Among the purely electrical malfunctions of the starter, it is customary to distinguish the following:
- Failure of traction.
- Armature collector wear.
- Weakening of the brush group.
Obviously, various measuring instruments come to the aid of a person if problems related to electricity arise. As a rule, experienced motorists always keep a tester in the car, which makes it easy to determine one or another malfunction of the starter.
If there is no tester, then an ordinary 12-volt light bulb will quietly perform its functions.
Below is the algorithm for conducting a test using a 12 volt indicator.
- Connect one end of the light bulb to the holder of the starter brush assembly;
- The other end of the homemade tester is on the case.
Diagnostics is carried out: if the light comes on, then the brush assembly needs to be replaced, there are obvious breakdowns.
To test the brushes with an ohmmeter, you need to measure the resistance between the brushes and the base plate. If the value is not equal to infinity, the brushes need to be replaced.
Battery test
The starter can also be checked with the battery. The procedure makes it clear if the starter is functioning properly. To do this, you need to dismantle the starter, put it on the battery, and then short-circuit the battery terminals with the ends of the starter.
More precisely: the negative terminal of the battery must be connected to the starter housing, and the positive terminal to the upper end of the traction and switch-on contact.
The serviceability of the device can be judged by scrolling the motor and moving the bendix forward. If this does not happen, the fault can be clearly identified.
Separate checks
Separately, you can test various parts of the starter, including the traction relay. The positive terminal of the battery is connected to it, and the negative terminal is connected to its body. If the relay is in order, the bendix should move forward.
If the bendix does not extend, the following problems can be identified:
- Jammed anchor;
- Burnout of the winding;
- Burnout of relay contacts.
You can test the bendix itself separately. The body of the overrunning clutch is clamped in a vice through a soft gasket and then manually scrolled left and right.

A serviceable bendix should not turn in both directions, as this will indicate damage to the stopper and a malfunction of the overrunning clutch. It is clear that the bendix rotating in both directions will not allow the starter to spin normally, but only when it is idle.
As for checking the winding, this is done with special devices, such as a de-stand. Again, if there is no device, you can use a light bulb, but already at 220 V. The principle of the test is to detect breakdowns. As in the case of brushes, you need to connect the tester with one end to the body, the other to the winding terminal. The breakdown can be judged by the light bulb lit up.
If an ohmmeter is used, then its readings should not exceed or be less than 10 kΩ.
You can check almost all parts of the starter, including the anchor.
Video in this article: how to check the starter yourself
As you can see, there are many ways to determine the malfunction of the starter on your car. And you can do this with your own hands, without the use of any complex devices and technologies.
Despite the wide variety of car models, the starters used in them have almost the same design and work according to the same principle.
The figure shows the electric starter connection diagram used in cars.
The starter operates in the following sequence. When the ignition key is turned, the contacts are closed.Sand power from the battery is supplied to the windings of the retractor 3 and holding 4 relay at the same time. Anchor 5 the solenoid relay moves inside the relay core and thus, by means of the rod 6 , causes the lever to turn 7 pushing its other end through the drive coupling 8 , gear 10 meshing with the flywheel ring gear 11 ... At this time, the starter motor through the winding 3 receives power from the vehicle battery and starts rotating at low revs. When the anchor presses the contact plate 2 to contact bolts 1 , power supply to the electric motor 12 enters directly through the contacts, bypassing the pull-in winding. The resistance of the power supply circuit of the electric motor decreases, and it develops maximum speed... In this case, the gear 10 through the flywheel ring gear transmits torque to the crankshaft and the internal combustion engine is started. When the revolutions of the crankshaft begin to exceed the revolutions of the starter, the freewheel comes into play 9 .
The pinion remains in mesh as long as the contact bolts are closed. Also, as can be seen from the figure, pulling in and holding the windings, with an open contactS, are connected to the battery in series. And since they have different winding directions, but the same number of turns, they create magnetic fluxes that are the same in magnitude, but opposite in direction, thereby neutralizing each other. The contact plate under the influence of the spring moves to the right and opens the circuit, at the same time acting on the lever 7 and disengaging the gear with the flywheel.
How to check a starter without removing from the car
Let's take a look at the common symptoms of a starter problem and find out if how to check a starter at home.
Starter activation and subsequent spontaneous shutdowncan be accompanied by clicks of the switching relay or the starter traction relay. The main reasons for this problem include:
- Defective or discharged battery.
- Low ambient temperature.
- Oxidation of the wire contacts, as well as their loose attachment to the battery terminals, traction relay and the car body.
- Faulty enable relay and / or starter traction relay.
As you know, lowering the temperature of the electrolyte to -20 ° C leads to a decrease in the battery capacity by 20%. Also, at low temperatures, the viscosity of the electrolyte increases, which prevents its contact with the active mass of the electrode plates and thereby reduces the voltage at the battery terminals. Based on the above, check the starter on the battery in low temperatures it will be difficult. If we add to this the possible oxidation of the contacts on the terminals of the connecting wires, then the reasons for the spontaneous shutdown of the starter become clear.
Next, evaluate the oxidation state of the contacts by measuring the voltage at the battery terminals and at the terminal of the traction relay and the starter housing at rest, and then when the starter is turned on for 3-4 seconds. The difference between the measured readings should not exceed 1.5 V (it is optimal that they are the same). It should be remembered that the voltage at the terminals of a working 12-volt battery must be greater than or equal to 10 V. For a 24-volt battery, the voltage drop should not exceed 4 V (i.e. U battery ≥20 V). Otherwise, it is required to clean and check the strength of fastening of the lugs of the power wires.
Traction relay
The functions of the traction relay are as follows:
- Engaging the starter drive gear with the engine flywheel rim.
- Short circuit of the starter motor power supply circuit.
Although retractor relays from different manufacturers differ in the number of windings, the method of fixing on the starter, the design of the contact terminals, they all share the same functions and principle of operation, similar to the operation of a conventional solenoid.

If you look at the section of the traction relay in the figure above, you can see that it contains two windings (holding 13 and retracting 14 ), screwed onto a brass bushing where the anchor moves 11 acting on the rod 15 with movable contact disc 4 ... Two immovable contact bolts fixed in a plastic cover 2 ... The contact disc can be of various shapes (rectangular, round or shaped) and installed isolated from the stem. One of the most common problems in this contact pair is burning of contacts or their welding. This is the first reason why it is not recommended to keep the starter on for more than 5-6 seconds, the second is the accelerated discharge of the battery.
How to check the starter relay
To check the starter traction relay, connect its terminals with rechargeable battery observing the polarity. If the device is working properly, the starter gear will move and you will hear characteristic clicks.
There is a video on our YouTube channel, by watching which you will find outhow to check the starter with a multimeter (using a conventional current clamp) if available car battery, as well as localize the cause of the malfunction.
 Russian car brands
 The process of replacing the timing belt at the fret grant
 When to change the timing belt for Lada Granta: recommendations of the plant and grant-makers