Dragon Age: Inquisition - Walkthrough: The Hinterlands - Non-Story Quests. Dragon Age: Inquisition - Walkthrough: The Hinterlands - Non-Story Quests Dragon age inquisition mosaic walkthrough
Throughout Thedas and Orlais there are 60 mosaic pieces waiting to be found to complete five mosaics. Finding each mosaic piece will grant you 50 XP and completing each set gives you 200 Influence. The mosaics are displayed on the walls of Skyhold and can be translated by Gatsi for a Codex entry.
This post will show you where the mosaics are displayed in Skyhold so you can see which pieces you are missing. The lists below will then tell you where each piece of the mosaic can be found.
The fall
All twelve pieces of this mosaic are found in The Hinterlands. You can find this mosaic on the wall near Vivienne, on the upstairs balcony.
| 1 | During “The Mercenary Fortress” you will go to the Grand Forest Villa. The first mosaic piece is at the top of a tower on the western part of the fortress. |
| 2 | This piece is inside a locked office in Valammar. |
| 3 | Also found in Valammar, inside the Vault. |
| 4 | Leaning against the wall of a house beside Lake Luthias. (The house where you first encounter Blackwall) |
| 5 | At the top of a tower in Winterwatch Tower, which you will visit during “Praise the Herald of Andraste”. |
| 6 | There is a house north of the Upper Lake Camp which is derelict but locked. Use a hole in one of its walls to enter the house and collect this piece. |
| 7 | You will find this piece right next to the Fort Connor landmark. |
| 8 | At Redcliffe farm there is a house near the notice board that gives you the “Where the Druffalo Roam” quest. This piece is inside the house. |
| 9 | In Dead Ram Grove you will find the Veilfire Cave. You will find this piece in the second room of the cave. |
| 10 | This piece is also found inside the Veilfire Cave, in the very bottom of the cave. |
| 11 | Find a ruined tower west of Dusklight Camp and you will find this piece. |
| 12 | During “Trouble With Wolves” you will go to Wolf Hollow. You can find this last piece in an alcove of this cave. |
The archdemon
All twelve pieces of this mosaic are found in The Western Approach. You can find this mosaic on the wall right next to Gatsi. 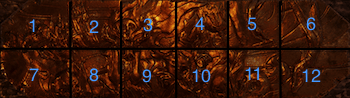
| 1 | Found inside the Sand Rock Mine, right near the Red Lyrium Vein. |
| 2 | Another piece sits outside the Still Ruins. You can get a quest from Frederic that will lead you here. |
| 3 | This piece is next to the Lost Idol landmark, inside Lost Wash Creek Cave. |
| 4 | To get this piece you will need to complete the Crossing the Sulfur Pits mission from the war table. When you have done this head to The Thing in the Dark dave to fine this piece. |
| 5 | To reach this piece you will need to defeat the Abyssal Dragon. When it is dead an entrance is revealed leading into a cave where you can find this piece. |
| 6 | FOund in the same cave as piece number 5. |
| 7 | Complete the quest “On the Chantry Trail” and it will lead you to a cave where you will find this peice. |
| 8 | This piece is under the Hidden Stairway landmark. |
| 9 | To get this piece you will need to find and solve all three Astrariums, because it is inside the Astrarium cave. |
| 10 | You can find this piece between the Gates of Andoral and Coracavus. |
| 11 | Look around in Echoback Fort for this piece. |
| 12 | When you have taken Griffon Wing Keep, go down into the cave beneath it to find the old well. There is a mosaic piece hiding behind a rock near the bucket. |
Invasion
This mosaic is spread across two locations. There first seven pieces are in the Emerald Graves and the remaining five are in the Exalted Plains. You will find this mosaic on the wall of the Great Hall, to the right of the main entrance.

| 1 | Head to the Ancient Baths and get a warrior to break through a wall so you can get the piece behind. |
| 2 | Go into Unadin Grotto and you will find a mosaic piece in the last room. |
| 3 | This piece lies next to the Dead Hand landmark, before entering the cave. |
| 4 | There is also a piece lying inside the Dead Hand cave, inside the main chamber. |
| 5 | You will find this piece inside the Veridium Mines. |
| 6 | When you have cleared Argon's Lodge of the bandits, you will find a mosaic piece inside one of its small rooms. |
| 7 | When you have found the Din'an Hanin landmark, look outside its door to see this piece. |
| 8 | Head east from Lindiranae’s Fall so you are stood on some rocks overlooking Riel and you will find a mosaic piece. |
| 9 | Another piece can be found inside the Din'an Hanin landmark. |
| 10 | Take a warrior with you into Villa Maurel. When you reach the study there is a wall that the warrior can break through and the mosaic piece is in this adjacent room. |
| 11 | To get this piece you will need a rogue that can pick locks to open a door inside Chateau d'Onterre |
| 12 | This piece can also be found in Chateau d'Onterre, but you will need to jump out of an upstairs window on from the ledge onto another rooftop. |
Sacrifice
All twelve pieces of the Sacrifice mosaic are found in the Hissing Wastes and the mosaic is hung near Varric's fireplace. 
| 1 | Look for the Occularium near Sunstop Mountain camp. There is a gazebo near this Occularium that has this piece inside. |
| 2 | When you find the Venatori camp you will be prompted to search for a hidden item, which turns out to be a Bottle of Thedas. Near this there is a mosaic piece, beside a camp fire. |
| 3 | Head out the back of the Venatori camp and look for another campfire with a mosaic piece nearby. |
| 4 | When you come down from the Mountain Fortress Tomb you will climb down many ladders and platforms. At the bottom of the last ladder you will see a mosaic piece. |
| 5 | Complete the Veilfire puzzle inside the Mountain Fortress cave and you will find a mosaic piece behind the door you unlocked. |
| 6 | Solve another Veilfire puzzle inside the Four Pillars Tomb to get the mosaic piece behind the locked door. |
| 7 | Head to the Oasis landmark and look nearby for this piece. |
| 8 | Behind the locked door in the Burial Grounds Tomb. Solve the Veilfire puzzle to open it. |
| 9 | Solve another Vielfire puzzle in the Statue Tomb to get another mosaic piece. |
| 10 | Head south-west of the Canyon Camp and look around for a ruin. The mosaic piece is amongst this ruin. |
| 11 | Inside the Canyon there is another tomb with a Veilfire piuzle. Solve this one to get the mosaic piece from inside. |
| 12 | This piece lies inside Fairel's tomb, which is located near the High Dragon. To get in to this tomb you will need to solve all five Veilfire puzzles to get the key. Once inside you will find a mosaic piece. |
Freed Are The Slaves
The pieces for this mosaic are scattered in many different locations, unlike the others which are found in one location alone. This mosaic hangs near Vivienne, on the north wall. 
| 1 | After you have taken Caer Bronach in Crestwood, find the requisitions table and go through the door to the right of it to find a piece. |
| 2 | Also in Crestwood, go to the Old Market Road and head into a cave leading off it to find a piece inside. |
| 3 | Still in Crestwood, head into the Flooded Caves after completing “Still Waters”. Inside the cave there is a mosaic piece deal with the rift and find a piece in an adjacent room. |
| 4 | Also in the Flooded Caves, look for a wall that a warrior can break through then descend the ladder behind it to reach the mosaic piece. |
| 5 | A third piece can be found in the Flooded Caves and is on a table next to the ladder that is your exit. |
| 6 | In the Forbidden Oasis look for a tunnel east of the Solasan temple and head inside to find a mosaic piece. |
| 7 | If you can find four glyphs in the Exalted Plains you will get a mission on the war table to investigate these glyphs. Complete this and you can head to theLost Temple of Dirthamen where you will find a mosaic piece in one of its rooms. |
| 8 | Also found in the Lost Temple of Dirthamen. |
| 9 | In the Fallow Mire, during the “Lost Souls” quest, when you have rescued the missing soldiers look for a locked door in the fortress and get the mosaic piece from behind it. |
| 10 | To get this piece you will need to find a dead elf in Empris du Lion and read his journal. You can then complete a war table mission called “Rumors of the Sulevin Blade”. You can then go to the Cradle of Sulevin where you will find a piece of hte mosaic. |
| 11 | In the Western Approach enter the Still Ruins and look for a locked door that has a mosaic piece behind it. |
| 12 | In the Western Approach head into Coracavus and find the mosaic piece behind a locked door. |
The plot of the third part of Dragon Age is straightforward and simple-minded. Forks are rare, the answers in the dialogues have little effect. The role-playing system has shrunk to three classes and a pitiful set of active and passive skills, with which you have to spend at least 30 hours. If you wish, the adventure can be extended to a hundred. Anything, but monotonous missions here are full. One gets the impression that they were invented by the mail order generator in the style: "Find item X in location Y, return owner Z".
The world is facing a catastrophe again. Demons break through open gaps, and only the Chosen One with a magic seal on his hand is given to close them. We create the chosen one ourselves in a convenient editor, choose a race for him, sculpt a face and determine the field of activity (magician, warrior, robber). Whatever freak you create, they quickly recognize the only hope of humanity (and other peoples), establish the Inquisition, and put a murky stranger at the head of the organization.
The antagonist is a fanatical sorcerer. He rarely appears in the frame and is stereotyped to a yawn. He speaks like a villain from a script for a children's cartoon thrown into the trash can: "I will become a new god!", "Kneel down to me!" and so on, and so on. The motivation of his minions is at about the same level, so every (everyone!) Battle with the story boss is preceded by a long and tedious conversation. The idiot hero looks at some sinister ritual and tries to reach out to the callous heart of the fantasy terrorist with words. The henchman denies, the ritual continues. In any case, everything ends in a predictably drawn-out fuss, which is called a battle here.
Fortunately, there are not many story missions, only ... six. If desired, they could be run for five or six hours, exhale and calm down, but Dragon Age: Inquisition is not one of those who so simply let go of themselves. You have to go through a lot to see the final cutscene from a series of carelessly drawn pictures.
The right to go on a mission must be earned, or rather bought. A new location or story mission opens only if you have enough "influence" points. Therefore, the player is often faced with an unpleasant fact: he would like to teach the villain a lesson, but he must earn a reputation.
In Dragon Age: Inquisition there is no open world, no dynamic change of weather and time of day, no cities or villages. Sometimes there are houses with three or four idol-dwellers, but the practical use of them lies in a couple of new postal tasks: here, around the bends, there is a cave with an artifact (bring it), and there is a herd of mountain sheep behind the fence (kill). There is no simulation of life, no attempt to entertain with random events. But there are dragons. They graze in the meadows designated for them, waiting for their hero.
The off-plot locations are huge, really huge, and they are inundated with such exciting missions as collecting herbs and stones, finding mystical shards and pieces of mosaic. Each attraction must be marked with a flag. Open gaps must be cleaned of demons and closed. Sometimes they are forced to draw constellations. Somehow, this also increases the "influence". That's all the entertainment for dozens of hours of passage free from the plot. Bandits and wild animals roam the locations. They are constantly reviving, so getting rid of them once and for all will not work.

Other missions one way or another result in the need to find something in the specified location (a detector of useful things is built into the hero) or kill someone. Even emotionally they do not stand out in any way. Bioware has designed individual dialogues in a manner peculiar to itself, with attention to the direction and gestures of the interlocutors. All the rest is the chatter of dummies who just stand opposite each other and open their mouths.
The world is beautiful, often magnificent, sometimes it takes your breath away from the panoramas. But the devil is in the little things. Most locations, despite their impressive size, are dotted with narrow passages, like labyrinths. Because of this, not only does the feeling of constriction not leave, it also becomes difficult to get from one point to another. The hero does not climb every hill, rests against inconspicuous stones under his feet, invisible walls shatter the illusion of freedom.
The feeling of the artificiality of this world does not leave. It is oversaturated with treasure chests. Flowers and plants are reborn at the same rate as robbers and animals. The eye now and then clings to unnatural objects. A lit candle near a decayed corpse. Burning torches in a dungeon that was flooded a minute ago. A refugee camp set up right in the middle of a wide stream. And without that, the adventure is not happy, ten hours later, after the dreary installation of flags and the collection of fragments, it begins to feel nauseous, and then the atmosphere itself crumbles.
A horse is used to move quickly. Useless in many respects, a brute, because at locations in certain places you can establish camps, and through them you can instantly teleport from one area to another. The horse has a couple of outlandish abilities. She appears out of nowhere and disappears into nowhere. If you climb on it, then the partners dissolve in the air, and if you get off, they instantly appear behind your back, as if they were all the time here, sly ones.

The party came together as boring as the villain's personality. Some characters are familiar to us from previous games in the series (for example, the dwarf Varric and the interrogator Kassandara immediately adjoin the squad), others are presented for the first time. However, this does not negate the fact that the entire Inquisition consists of manish women and effeminate men. There are guys of a fierce look, but you can drag them into bed, regardless of race, gender and length of horns. It is not so easy to get away from the vengeful wand of the Grand Inquisitor. Several heart-to-heart dialogues, and hearts are drawn by themselves in the air.
Apart from conversations with his beloved subordinates, there is not much to do in the castle of the Inquisition. In the forge, you can forge weapons and armor according to the found schemes, insert runes into them, improve potions, and change the layout in some places. Here they are quickly confronted with the fact that the found herbs, stones and animal skins are still as important, and in huge quantities. And the Grand Inquisitor, bowing his head, sets off on another campaign.
On the one hand, we have something like the Chosen One, the head of a growing organization of many hundreds of people, with an army, siege engines, scouts and spies. He has a throne, and he even sometimes judges criminals (more precisely, determines the punishment in a short dialogue). On the other hand, in the Inquisition, it seems, there is only him and a small detachment of his friends who are engaged in all the dirty work. This was not evident in previous Bioware games, where we followed the orders of those in power. But here the Grand Inquisitor himself appears, no one decree, he is admired, songs are sung to him, and he suffers from nonsense, collects herbs and marks antiquities until he gets enough "influence" to complete the next story mission.
The command headquarters has a large map with marked missions. In addition to them, there are tasks for, so to speak, agents. Nonsense errands with superficial descriptions. They are carried out automatically in a few minutes or hours, allow you to get a little money in the treasury, a handful of resources or a new defendant. Apparently, there was an idea to add strategic elements to the game, but the implementation turned out to be so dreary. One way or another, you have to do everything yourself.
And no, the Grand Inquisitor cannot be good or bad. He often chooses between "cool", "dumb", "smart", "romantic" phrases, but the answer rarely influences anything. Only relationships with partners are corrected or deteriorated.

There are only a couple of dilemmas in the campaign when it comes to choosing between two characters (not squad members). However, since you don't have time to really get to know them, you don't care about them, further fate does not touch. In such circumstances, the "colorful" final of Mass Effect 3, which caused a lot of controversy at the time, is just a gift. They allowed at least something to be decided.
The combat system could be an outlet, but it is more annoying and rests on the limitations of the role-playing system. The game is very long, but in 40 hours of playthrough you will have time to pump the hero somewhere up to level 18. At each level, only one point is given for the development of abilities. This results in an extremely limited set of active and passive skills, which barely expands throughout the game. There are also few types of enemies, which is why the first five hours of Dragon Age: Inquisition differ from the last only in decorations.
The enemies are too tenacious, there are many battles, and each of them takes place according to a rehearsed scenario without surprises, including battles with annoying "fat" bosses and dancing around so-called dragons. Killing them is easy, especially if you take advantage of the gaping holes in game design. But long, boring, tiring. And at the same time, the return is not felt. 15 minutes to beat the dragon and get a bunch of garbage as a reward? Is this not a mockery.
Over time, the battles do not get easier, as the level of enemies grows with the heroes. During fights, the behavior of the dangling camera is annoying. Controlling on a PC with a mouse and keyboard does not add to the convenience.
Companions in battle behave quite adequately, do not die just like that. In times of peace, they sometimes chat with each other. However, you won't be able to take all the pretty girls with you on the mission. Playing in a forced form makes you drag characters of different classes with you, since only a warrior can knock out certain walls, a magician can restore bridges, and a thief can break open locked doors.

The above features put an end to the relevance of the multiplayer mode, since it repeats the shortcomings of the single player campaign, only an unstable connection is added to them. Players take different classes, pump them up, buy chests with secret contents and again go on a hike along the gut-like corridors to kill tenacious enemies. There are no dynamic battles, no variety of weapons and armor, no opportunity to fashion a unique hero. There are only graphics. But this element is not very important for role-playing games.
Diagnosis
After passing through, you regret most of all about the breakthrough of the time spent. Dragon Age: Inquisition has neither a good plot nor interesting characters. The game rarely allows anything to be decided and does not allow you to act out the role at all. It is terribly drawn out and full of missions of the same type. She does not feel either the joy of pumping the hero, or delight after killing the next boss because of the unprecedentedly tight development system and a limited set of weapons and armor. The only thing that pleasantly surprises the game is the graphics, which, however, cannot compensate for the many blunders made by the developers when creating a new world.
- Excellent graphics, many beautiful locations
- Criminal trials are sometimes pretty funny.
- Sophisticated system for creating weapons and armor
Contra:
- An inanimate, artificial world with invisible walls
- A huge number of design mistakes (both in the plot and in the design of the world)
- Empty plot with a formulaic antagonist
- The need to buy missions for slowly earning "influence" points
- A bottomless burst of similar missions
- Tight development system
- The same type of battles with the same type of enemies and bosses
- Tediously long and easy battles with dragons
This quest is given to you by the elf refugee at the Crossroads. He paces back and forth literally three meters north of the fast travel point. His wife needs a special potion, and only their son Hendel, who has joined some strange cult and is currently in his camp, knows how to cook it. Go there. The leader of the cult, the preacher Anais, will not be particularly happy to see you, but she will open the gates to the fortress. Hendel is on the second level of the fortress. Talk to him - and he will give you the desired potion. Return to his father in the camp at the Crossroads, give the potion and complete the quest. (Solas and Cassandra will slightly approve of your efforts.)
Glory to Herald Andraste
This very small quest is given to you after talking with the preacher Anais (see previous quest). Close the Rift, which is right in the courtyard of the fortress. This will convince everyone of your divine destiny, and you will even get the opportunity to recruit cultists to help the Inquisition.
Love will wait
On the corpse of a noblewoman named Wellina in Dwarven Pass, you will find a letter from a certain Lord Berand. Apparently, the poor man was on the way to her beloved, but in her misfortune she found herself in a conflict between apostates and templars.
Lord Berand is in the same fortress as the son of the refugee you need to find for the Shallow Breath quest. Inform him about Lady Wellina's death and you will have the opportunity to recruit him as an agent of the Inquisition. In addition to increasing Influence, agents of the Inquisition also reduce the time your advisors spend on completing their missions.
Lord Berand will become an agent of the Inquisition on your report on Wellina's death anyway, the difference is that if you ask him directly about it, he will become an agent assigned to Cullen (Cassandra will approve of this), and if you advise him to return home and to protect the people there, then he will become an agent assigned to Josephine (Solas and Sera will approve of this).
You will need to close the Rift in the fortress to complete this quest completely.
This quest can be completed in the reverse order: that is, first find Lord Berand, who will complain to you about the strange delay of his beloved, then find her body, which in this case will be marked with a quest marker - and then as above.
The pangs of hunger
A refugee hunter at the Crossroads camp will inform you that they are short of food. Forest and mountain sheep gallop in abundance in the surrounding mountains and forests. Hunt them and deliver 10 mutton to the hunter to complete the quest and get Solas and Sera's easy approval.
In the Power of the Elements
This quest gives you the recruit Whitl at the Crossroads refugee camp. Refugees suffer from the cold as they do not have an adequate supply of blankets. Whittle will assume there are likely supplies to be found in the renegade mages' caches. There are five caches in total, and they are not even very far from each other - some are right on the surface, some are in caves. Follow the marker on the map and you will find them easily. After you find all five caches, report to Whitlu. In addition to a point of Influence and experience, you will also receive approval from Solas, Sera, Cole, and Cassandra.
Healing Hand
Corporal Vale mentioned that the refugees need a healer. Such a healer - or rather, an elf healer, is located in the village of Redcliffe. You need to persuade her to go to help, as she is afraid that the refugees will treat her badly due to the fact that she is an elf. You can persuade her if you yourself are an elf, if you have Cassandra or Solas in your group, or if you have the Knowledge of Nobility or History perk.
The same healer will give you three small sub-quests to collect herbs for the needs of refugees. Ask her what she needs and then read the list on the table. The list will be updated twice when you bring the elf the herbs she needs.
You need to find:
1. 4 elven roots and 2 spindles.
2.6 elven roots and 1 royal elven root
3.5 spindles and 2 pieces of Crystal Grace.
Refugees as Agents of the Inquisition
This quest does not appear in the journal, but if you have completed all three of the above quests to improve the living conditions of refugees, then go and talk to Corporal Vale, and in gratitude he will offer help to the Inquisition. You can recruit refugees as agents for any of your three advisors of your choice. As an added bonus, almost all of your associates will approve of this - even those who were not present in the group.
Amulet to the Beloved
Not far from the Winter Watchtower you will find the corpse of a templar, and there is a letter for a certain Ellandra. In addition to the letter, you will find a phylactery amulet. Take it to the magician Ellandra (Solas will slightly approve of this). She is in a refugee camp. You will be able to recruit her as an agent of the Inquisition if your GG is a mage or if Vivienne is present in your group. (Solas won't like this, though.)
Unusual Duo
This quest can be obtained from the scout north of the camp in Dwarven Pass. He worries about the fate of a scout named Ritts. Go to the place indicated on the map and you will see a woman fighting off several templars. Help her win the battle.
Since Ritts is safe, you can go straight to the quest giver and report your success.
But have you noticed that your circle on the minimap is blinking? Maybe you should look around first? Follow the search arrow. You will find a picnic basket and a corpse. Talk to the rescued woman about what you found, and then go report to the scout.
If Varric is in your group or your GG is a gnome, then you can recruit Ritts as an agent of the Inquisition. (You can't do this unless you first find the picnic basket and the magica's corpse.)
Blood Brothers
You will receive this quest if you read a letter pinned to a post in a hut literally three steps south of your very first camp in the Suburb. Obviously, one of the brothers mentioned in the letter is a fugitive magician, and the brother-templar who wrote the letter is eager to meet with him and deal with the apostate. Go to the indicated place, search the corpse found there - and this will complete this quest.
Renegade Farmer
The quest is given to you by the elf widow in the Suburb. If you go exactly east of the southernmost part of the lake, then just south of your camp and almost south of the refugee camp (slightly east) you will find her hut. (There is one of the smaller Breaks next to her if you need an additional reference.) The Templars killed her husband, a farmer, for some reason mistaking him for a fugitive magician, and took his wedding ring. Templars you need are located southeast of the hut - deal with them and return the ring to the widow. Cassandra will slightly approve of your action.
Buster
(Subquests: Horses for the Inquisition, Trouble with Wolves, Farmer Safety)
This quest is automatically given to you on your first visit to the Hinterlands. Cullen would like to get good horses for his troops, for which he needs the best buster in the area, Master Dennett. You need to find Dennett and convince him to provide his horses for the Inquisition.
Master Dennett, however, won't give you any horses just like that. First, you must complete several sub-quests. He will direct you to Elaina and Bron, who are right there on the farm. Elaina will complain to you about the problem with the wolves, which have become more aggressive than usual. Bron will ask you to increase the safety of the surroundings by building watchtowers in suitable places.
Elaina's quest is quite simple - head northeast of the farms to the quest mark, where you will find a wolf's lair in the cave. In addition to the wolves, there will be a demon in it - when you deal with it, you can return and report to Elaina about your success.
Bron's quest consists of two stages - first you need to stake out the places for the towers (there are three of them, and they are automatically marked on the map). After that, a new mission will open on your military operations map, and you can send your soldiers to build towers. After completing the mission, return to Bron with a report.
After completing the tasks of Bron and Elaina, talk to Master Dennett, and he will finally agree to provide the Inquisition with his best horses. Moreover, you can even recruit Master Dennett himself as an agent of the Inquisition, if your group has Cassandra or Vivienne, or your GG has the Inquisition's perk for the knowledge of the nobility.
Horse Racing / Saddle
This quest gives you Master Dennett's daughter, Shane, after you get your first horse. Win three races beating Shane's time record. The races are not very difficult, the main thing is to aim carefully so that the horse does not rush past the pillars instead of passing between them. You need to perform them at a gallop - otherwise you will not meet the time. Demons at the nearby Rift usually do not pay attention to the GG rushing past on horseback, although the treadmill passes quite close to them.
You need to successfully complete three runs - each longer and slightly more confusing than the last - in order to fully complete this quest.
If Iron Bull is in your group, then he will approve of your every victory, but only if you win on the first try.
Measures Against Marauders
This quest begins by reading a letter in one of the empty houses on Radcliffe's farms. Someone Hessl writes to his friend that he will hide some documents in the caves of the northern hills. This quest can be combined well with the "Trouble with the Wolves" quest given to you by Henneth's wife Elaina, since the object of the quest is located in the same cave. You need to jump a little and go upstairs to find loot in a box on one of the rock ledges near the place where you found the demon on Elaina's assignment.
Where Druffalo Wanders
You get this quest by reading the announcement pinned to the fence at one of Radcliffe's farms. One of the farmers had his beloved druffalo Druffy (something like a nice variant of a bison) escaped. Find and return the animal to her regular pasture. It is not difficult to find her following the quest mark, but bringing her back can be somewhat problematic - the druffalo is in no hurry, this is, firstly, and, secondly, sometimes it can simply get stuck in some narrow place, so try to go with Druffy take your time and choose a route more conveniently to the desired corral. After Druffy is there, talk to her master to complete the quest.
Letter from the Beloved
Begins by reading a letter found at an abandoned camp site in the Grove of the Dead Ram. The addressee of the letter is instructed to take felandaris and bring it to a certain statue of a stone lady. You won't find Felandaris in the Hinterlands, so you'll have to return to this quest a little later.
When you finally find the plant you want, return and bring it to the statue. Kill the demon that appears, and this will complete this quest.
Claws for Bergrit
Begins by reading a letter on a corpse on a mountain path almost exactly west (and slightly north) of your Redcliffe farm camp, next to one of the shards. If you look down from it, you will have a wonderful view of the farms. Collect three large bear claws. Big bears roam on the territory marked by the quest marker (and only on it). When you collect three claws, this will complete this quest. (The claws can be used in crafting.)

Renegades in the Witchwood
Given after reading a letter found in a hut north of the crossroads. You can also get it by removing the note from the slain Renegades. The note drops out randomly, the letter is always in place. Slay the renegade mages at their camp in Witchwood. The apostates' hideout is in a cave and is protected by a fire barrier, so prepare spells and staves of cold to overcome it. In addition to the mages, there will also be mercenary warriors. A unique staff with cold damage can be removed from the corpse of the leader of the magicians, and in the cave - in addition to loot in various chests and bags - there is a royal elven root.
This quest can also be activated by simply stumbling into a renegade hideout. It is located southwest of Redcliffe Castle (marked on the map with a blue marker).

Templars in the West
Almost a mirror image of the previous quest. Slay the rebellious templars by clearing the camp of them. The quest is given either automatically after you find a Templar camp near a waterfall southwest of your Upper Lake camp, or after you read a letter taken from the corpse of a Templar you killed (the letter appears to appear after a certain number of killed templars and therefore may be on the corpse in different locations). The camp of the templars is located on the top of a small mountain and, unlike the camp of the magicians, is not guarded by any barriers, so it is somewhat easier to get to it. Templar squads are archers and warriors with shield and sword. The leader of the Templars - the Shield Warrior - is not much different from the regular Shield Templar and should not cause problems. A unique one-handed sword can be removed from his corpse.
Relationships - Inner Earths
The quest begins when you find a suicide note on a skeleton in Old Simeon's Cave. It is located on the border of the map almost exactly to the west (and a little to the south) of your very south-western camp, previously one of the gaps was located in it. The quest icon will become visible when you close the Rift. You need to jump a little over the rocks to climb up to a small branch in the cave where the skeleton lies. Take the note to his family's home on the Redcliffe Farms and drop it in the mailbox.

Business relationship
You start this quest when you read the letter from the Templar's corpse, which lies a few steps from the corpse, which you must find in the Blood Brothers quest (just north of your camp in the Suburb if you need an additional reference). From it you learn that a certain Tanner secretly maintains business with the Templars. Tanner is located in the village of Redcliffe and is actually Tanner's church sister. If your group has Cassandra or Varric, or your GG has a perk for knowing the criminal world from Cullen, then in a conversation with her you can recruit her as an agent of the Inquisition.
East Road Bandits
This quest gives you recruit Belette east of the refugee camp. She will warn you that the bandits are not just random rogues, but, in her opinion, a much more organized group with some obscure goals. Go through the gorge and a little further you will come across the first group of bandits. Continue following the quest arrow while dealing with the bandits along the way. When one of the surviving enemies starts to run away from you as fast as possible, you are close to completing the mission. Follow him and kill the final group of opponents, which is located just on the site of your possible camp. This will complete this quest. If you search the camp, you will find a letter, which contains curious information about who and why hired the bandits for robberies on the roads.
Mercenary Fortress
The quest begins when you read the letter in the bandit camp, which you come across while following the quest "Bandits on the East Road" (see previous quest). It can also drop from random bandits, if you have not yet completed this task. The camp with the letter is literally a few steps west of the exit to the world map. In theory, the quest closes when you find a villa in the southern part of the map, captured by robbers, but real heroes won't leave it in the possession of some bandits, will they? If you go to the lair of the mercenaries and clear it, you can remove the unique heavy armor from the leader's corpse, and in the document nearby you will read additional information about the bandit employer, which will give you the Big Trouble quest.

Big Trouble
Go to the cave behind the waterfall in the southern part of the map. It is guarded by several members of the Dwarven Charter. Deal with them and go inside. Oddly enough, but the cave will turn out not to be a cave itself, but a part of the ancient dwarven teig - Valammar.
Be careful - the groups of gnomes that you will have to fight your way through in Valammar are often assassins who like to go into stealth and stab your heroes in the back.
Deal with the first group of the enemy and climb the stairs. (If you go around the stairs to the left, you will stumble upon a door that can only be opened by a special mechanism. This door opens from the inside, so now you will not be of any use from it.) Go further. On the Upper Terrace, in the very first room, you can read a note that mentions the Shadowspawn. There is also a wall that only a warrior can break. Behind it lies a small treasure with random loot and a couple of crafting schemes - for a grenade and a dagger.
The next door is closed and you need a robber to unlock it. Behind it you will find some random loot and a couple of notes that shed light on the activities of the charter. Go further and go down the stairs - and you will stumble upon the members of the charter, fighting with the Spawn of Darkness, which you read about in the note earlier. Behind the door nearby is the leader of the charter, whom you need to kill to complete this quest. Along with him are archers and assassins, and if your battle moves to the bridge, then for more entertainment several Spawn of Darkness can join it.
Your quest will end as soon as the leader of the charter dies. In the room where he was located, you will find even more papers describing the activities of the charter. One of them will even mention you. In addition, in the room there will be one part of some kind of gnomish mechanism, and right there next to it there will be two devices into which you can insert it. This will give you a small quest "Valammar Vault". As you can see, you need two parts to repair the door.
Cross the bridge and you will find yourself in the Hall of Elders. The first door is locked - only a robber can open it. Behind it you will find the second mechanism, as well as a piece of the mosaic. Go back and repair the mechanism, then turn both wheels and enter the treasury. This will complete your quest. Do not relax - there will be an ambush from the Spawn of Darkness led by the Leader-Harlock.
In the room you will find another piece of the mosaic, the Amulet of Power for Varric and various random loot. If you turn the wheel of the mechanism at the far door, you get a shorter way back - this is the same door that you came across near the entrance to Valammar.
Spirit of the Lake
The Storyteller in Radcliffe will tell you about the spirit of the lake if you ask him to tell you about the area. Go to the lake and leave the desired flower as an offering to the spirit (if you still haven't found the bloody lotus, then several grow near the lake itself), then look at a small reference to the legend of King Arthur, take the reward and thereby complete the quest.
Flowers for Senna
You get this quest from the gray-haired elf widower in the village of Redcliffe. Because of everything that is happening around him, he cannot put flowers on the grave of his late wife Senna, since she is far from the village and the path to her is now very dangerous. Promise him to put flowers, go and lay them on her grave, which is located near one of your camps, and report to the widower. Solas will approve of your help to the elf.
Playing with fire
You get this quest when you read the letter from the corpse, which lies slightly west of the southern point of the Upper Lake. The letter mentions a strange ritual that is supposed to summon someone's grandfather.
Go to the marked place and run around the statue from left to right three times, keeping as close to it as possible - and you will really call the "grandfather" - or rather, a very sickly dead man who will clearly be angry with you for worrying. Deal with him and this will complete this quest.
The Ballad of Lord Sherstley
One of the residents of Redcliffe, One-Eyed Jimmy, will ask you to find his ram, Lord Sherstley, who he says brings good luck to the family. Lord Sherstley is a very colorful looking ram, so you can hardly confuse him with others. He rides near where you first met Blackwall. You just need to catch up with him and say that his master misses him - he himself will run where needed, and you will have to go after him and talk to Jimmy. Or you can kill Lord Sherstley ... with very curious consequences, but you will not have the opportunity to tell the owner about them and in this case you will not be able to close the quest.
Sketch of the Kalenhad Bridgehead
On the corpse of the Templar to the southeast of your first camp, you will find a treasure map.
The treasure in the ruins of the Kalenhad bridgehead is located near where one of the relics of the Gray Wardens lies. Do you see the stairs behind the wall with no access? Jump up the rocks to get to it, get down, and using the search function, you will find hidden loot there.
The reward is a recipe for a Stone Armor potion.

Waterfall Map
Literally a step west of your camp near Lake Upper, there is a scroll with a treasure map at a certain waterfall. Although one waterfall is flowing quite close to your camp, if you look closely at the drawing, you will realize that it is not the same one. The one you want is located near the Templar Camp to the southwest. The treasure point is at the top, so you don't have to jump in the water at the base of the waterfall. Go up the path as if you were going higher and higher into the camp of the templars until you hit the rock - and activate the search function. The reward for your efforts will be a piece of Iron Bark, a rare crafting material.


Farmland Cave Map
You will find this map at the southernmost Rift in the area. Although it clearly depicts the house of Buster Dennett, the cave is actually not that close to it - you need to go deeper into the Grove of the Dead Ram - the desired location is almost exactly west of the nearby astrarium. Use the search function to find loot and complete the quest.


Landmarks in the Hinterlands
Each map features a long pole that glows with golden light. There are 17 of them in the Hinterlands. Landmarks automatically appear on your map in the form of a pyramid icon. All you have to do is find and click on them, thus making it clear that you have visited this territory and "reserved" it.
Holding the Inner Lands
Set up military camps in the Hinterlands. All you need to do is find a place suitable for the camp (it is marked on the map with a special tent icon) and settle there. The camps serve as resting places, resupply, points for fast travel. You also get an Influence point every time you organize a new camp.
A total of six camps can be organized in the Hinterlands, and after camp six your quest will be completed.
Breaks in the Suburb
Almost every card has one or more of these quests, depending on its size. You need to destroy small Breaks, weak copies of the main Breach - they are automatically marked on each card. However, copies are copies, but be careful, especially in the initial stages - some of the Breaks spit out very powerful demons and it is quite possible that even in the Hinterlands you may come across a Break, which you will not be able to do yet ..
In the Suburb, you need to close 2 Gaps.
Breaks - Dwarven Pass
.Close 3 Breaks in Dwarven Pass.
The Hinterlands Regions
Each territory has a similar quest. You need to visit all corners of the map. There are a total of 29 such mini-regions in the Hinterlands.
Astrariums in the Hinterlands
Astrariums are technical structures scattered across the map, having activated them, you see the starry sky and start a small mini-game. In the lower right corner, you are given a diagram of the constellation that is visible in this particular astrarium. Your task is to connect all the stars in exactly the same pattern, while never drawing the same line twice. When you have processed all the astrariums in a given area, you will receive an indication of the location of the cache, which usually contains a chest (or even several) with valuable things. When you pick things up from the chest, this completes the quest (on this map).
There are only three astrarium in this area, and all of them are automatically marked on the map. The southwestern astrarium is sometimes difficult to approach, as it is surrounded on all sides by mountains, but do not jump over the stones trying to climb up to it - a very convenient path leads to it - although it is sometimes difficult to spot it, it starts to the south and a little to the west from the astrarium itself. Also keep in mind when you connect the dots on this astrarium - there will be more stars in the picture than you need to connect for the Draconis Constellation. This is not the only constellation where the developers insidiously slip the player more points than necessary - so be careful.
The loot chest, which is a reward for unraveling the three astrariums of the Inner Lands, is located in the same cave as the refuge of the apostate mages, in which you may have already visited on the quest The Departed in Witchwood. Even if you have already examined this place, you will find there a small side cave that was previously inaccessible to you. Astrarium treasures cannot be found without first solving their riddle.
Shards in the Hinterlands
Interesting structures in the form of a pillar topped with a skull are scattered across almost all maps. These structures are eyepieces, a type of telescope that is tuned to detect specific debris. The ocularia are marked with a skull icon on the porridge map.
The shards that you collect with their help you will need in a certain temple in the Forbidden Oasis. With their help, you can permanently increase some of your characteristics. I highly recommend that you first collect all the shards available to you before you go to this temple. In order for this temple to become available to you, you need to complete the quests to study the shards, which will appear on your military operations table after you find the very first shard.
There are 22 shards in the Hinterlands. Most of them are easy to assemble. The exceptions are those shards (and that ocularium) that are in the Valley of Lady Shane - the abode of the High Dragon. As you can imagine, this in itself presents some problem. But even getting rid of the dragon, you can experience some difficulties with a couple of fragments that are lying around in an extremely inconvenient place for access. The shard at the top of the basalt rock is accessible with exceptionally precise acrobatic jumps. But with a little practice, it is quite possible to do it.
The second "difficult" shard lies on the top of the hill and seems inaccessible - but in fact it is much easier to get to it than to the one described above - you just need to find the right path. Look around the waterfall to the south of the shard - there is a jumble of boulders that you can climb.
The rest of the shards are in much more accessible places and should not be too difficult a problem.
 Hydraulic lifters of the car Hyundai Accent: disassembly and replacement features
 Poorly starts and stalls opel astra n
 Changing the oil in the gearbox on the Chevrolet Lacetti: when to change and which oil to choose?